a book on shoemaking
Edited by J.H. Thornton
Published by The National Trade Press, London
1953
Digitized by D.W. Frommer II
I. Shoe Design: Its Basis and Development
1. The Purpose of Shoes
2. Shoe Materials
3. Methods of Shoe Construction
4. Fashion
II. Pattern Cutting
5. Lasts
6. Practical Instruction
7. General
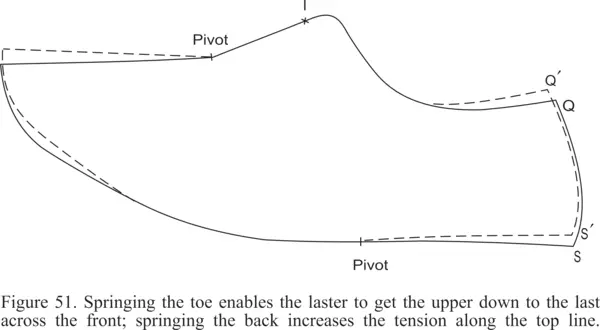
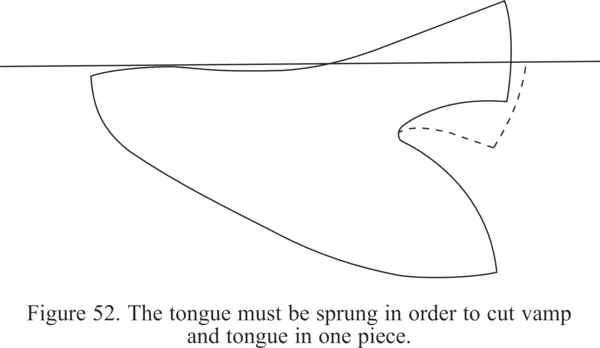
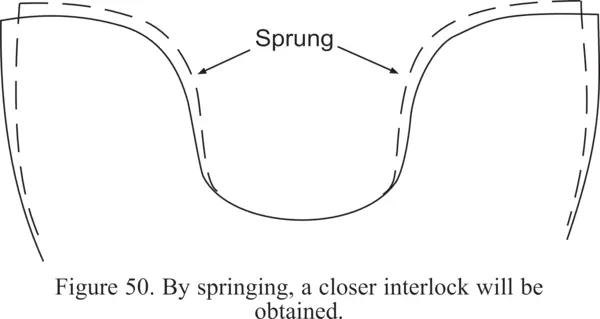
Spring in Patterns
- print page 89
- “changing the relationship between one part and other of the same patterns”
- “lengthen one line and shorten another”
-
Vamp Springing:


III. Clicking
8. Materials
9. Clicking Technique
10. Management
IV. Closing
11. Preparation
12. Stitching and Processes
13. Management
V. Bottom Stock
14. Cutting Bottom Stock
15. Preparation of Soles and Insoles
16. Lifts, Welts and Heels
17. Management
VI. Making
18. Hand Lasting
- Lasting machines mostly tried to reproduce hand methods.
- Changing now, especially with heat-shrink methods, like slip-lasting.
- Hand lasting survives for surgical and bespoke.
Preparations
- “tying-over”: temporarily lacing up
- Too Loose: vamp line moves, tabs below instep
- Too Tight: opposite effect
- Guideline: 1/8” between tabs
- Bespoke: varies with measurements
- Derby: up to the fourth eyelet
- Non-Blocked Front: leave bottom eyelets unlaced, to avoid winkling between tabs
- Insert stiffeners.
- leather best
- Sewn Seats: 5/8” skive to top line only
- Tacked Seats: all around
- Skive to fine edge so not visible.
- Pasted in 1/16” below the edge of the upper.
- Clear of wrinkles.
- Sprinkle with French chalk.
- Insert toe puff, which is skived all around.
Drafting
- Take the initial stretch out of the upper.
- Give the upper the approximate shape of the last to ease lasting later.
- “Hoisted Method”
- Place upper so bottom edge of back is 3/4” below the seat of the last.
- Pull 1/2” beyond the edge of teh insole, varying according to the shoe.
- “lasting rivet”
- “longitudinal strain”
- Next pull inside teh cap line, then outside the cap line.
- [Aside: The order of pulls 9-12 differs from those in Boots and Shoes. The forepart is pulled before the waist.]
- Check if the cap is straight.
- For sewn seats, the tacks aren’t driven home. For tacked seats, they’re driven straight through to clinch on the insole.
- The later pulls in the forepart aren’t always made.
- Examination
- cap straight
- upper tight to last
- linings clear
- backseam centered and straight
- top line tight
- gap between tabs in line with center of toe
Lasting
- Start with the inside waist.
- “Waist Drag” tool
- Then the outside waist.
- No waist drag, as there’s less curve to this side.
- Forepart: inside then outside
- Pull just enough make the upper fit tightly.
- Seat
- Again, not that much tension.
- Twist towards the back.
- Tighten the corners to avoid “fish-tailing”.
- Toe
- the hardest part: sharper curves, excess material
- Turn all the side strains toward the toe end.
- Beat the shoulder just below the tacks to mark the feather line for the welt sewer. Tool “jigger” or “beater”.
- Trim off nearly level with the tacks.
